Achtergrondinfo
Dit document bevat informatie over mijn server: jpserv. Ik ben begonnen met
het werken aan deze server in 2023, initieel maakte ik gebruik van oude
hardware Doorheen de jaren is de server geëvolueerd, samen met mijn kennis en
vaardigheden.
De server heeft nu een grote opslagcapaciteit, waarop ik mijn persoonlijke data en de data van mijn gezin opsla. Ook host het verschillende applicaties en services die dagelijks door verschillende mensen gebruikt worden.
Dit project was een van de eerste projecten waar ik aan begonnen ben als student met weinig kennis en ervaring. Maar door dit project heb ik een schat van kennis opgedaan. Deze server is ook mijn speeltuin waarmee ik kan experimenteren. De toegang tot zo’n speeltuin was cruciaal in de ontwikkeling van mijn vaardigheden en heeft mijn leertraject versneld.
Vanuit dit project heb ik bijgeleerd over:
- containers, docker, docker-compose
- Virtuele machines, hypervisors
- Cloud, applicatiehosting
- Linux, monitoring, serveronderhoud op lange termijn
- Filesystems, ZFS
- Backupsystemen en dataintegriteit
- Netwerken, VPNs, webservers, proxies, netwerksecurity, domeinen
- Automatisatie door scripting, Bash
- Computer hardware en bouwen van computers
- Debugging
- …
Dit document dient ook als referentiedocument (voor mezelf), om de gebruikte hardware en geïnstalleerde software bij te houden. Hierdoor zal de volgende tekst eerder technisch zijn van aard.
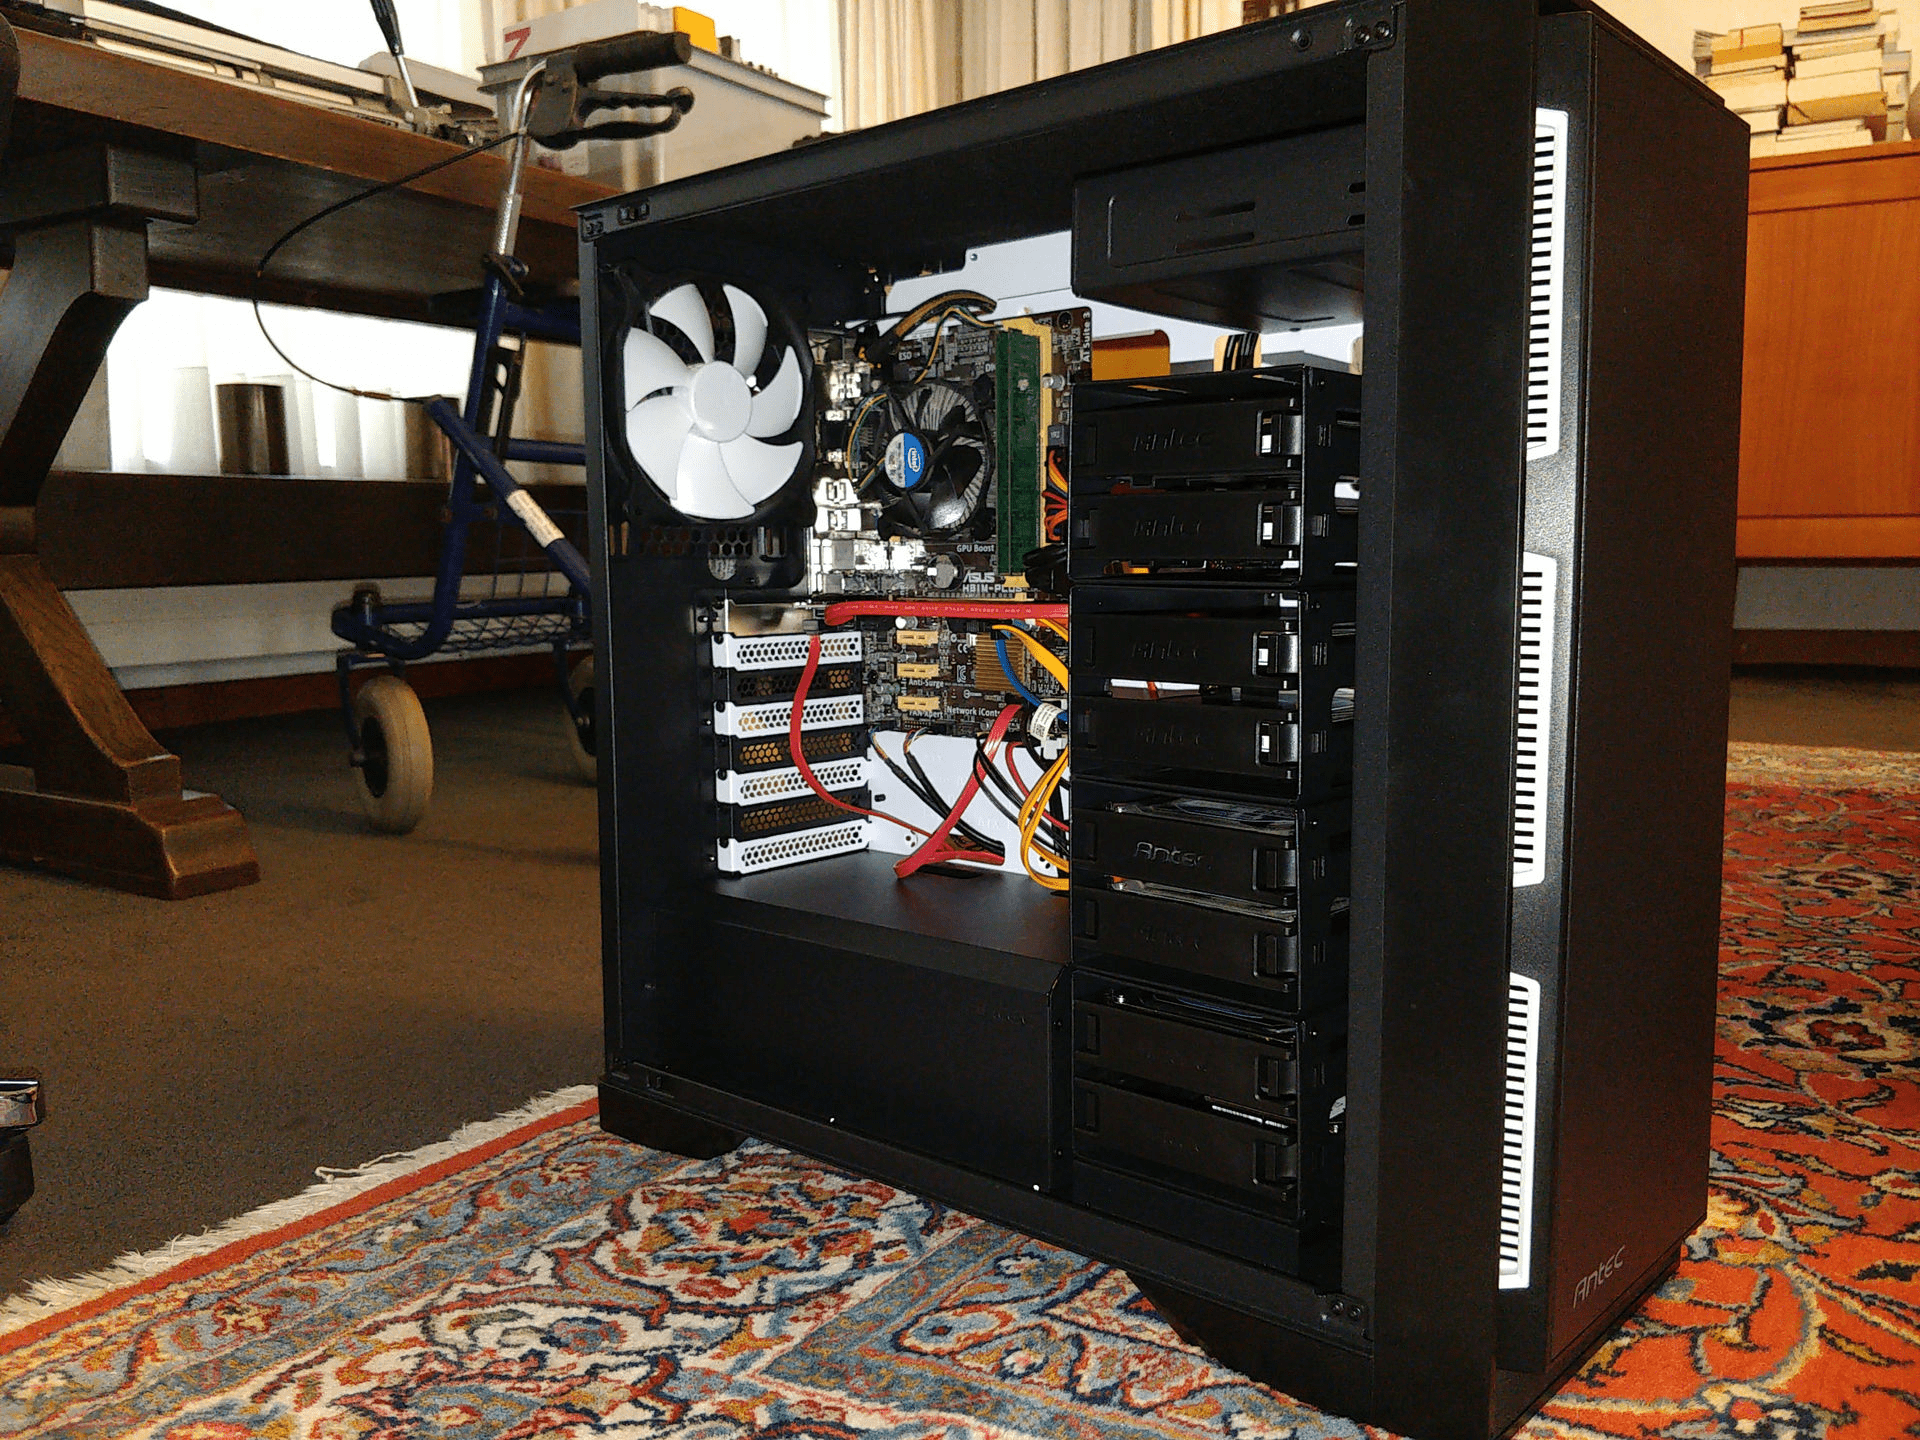
Hardware
Bouw
| Naam | Component |
|---|---|
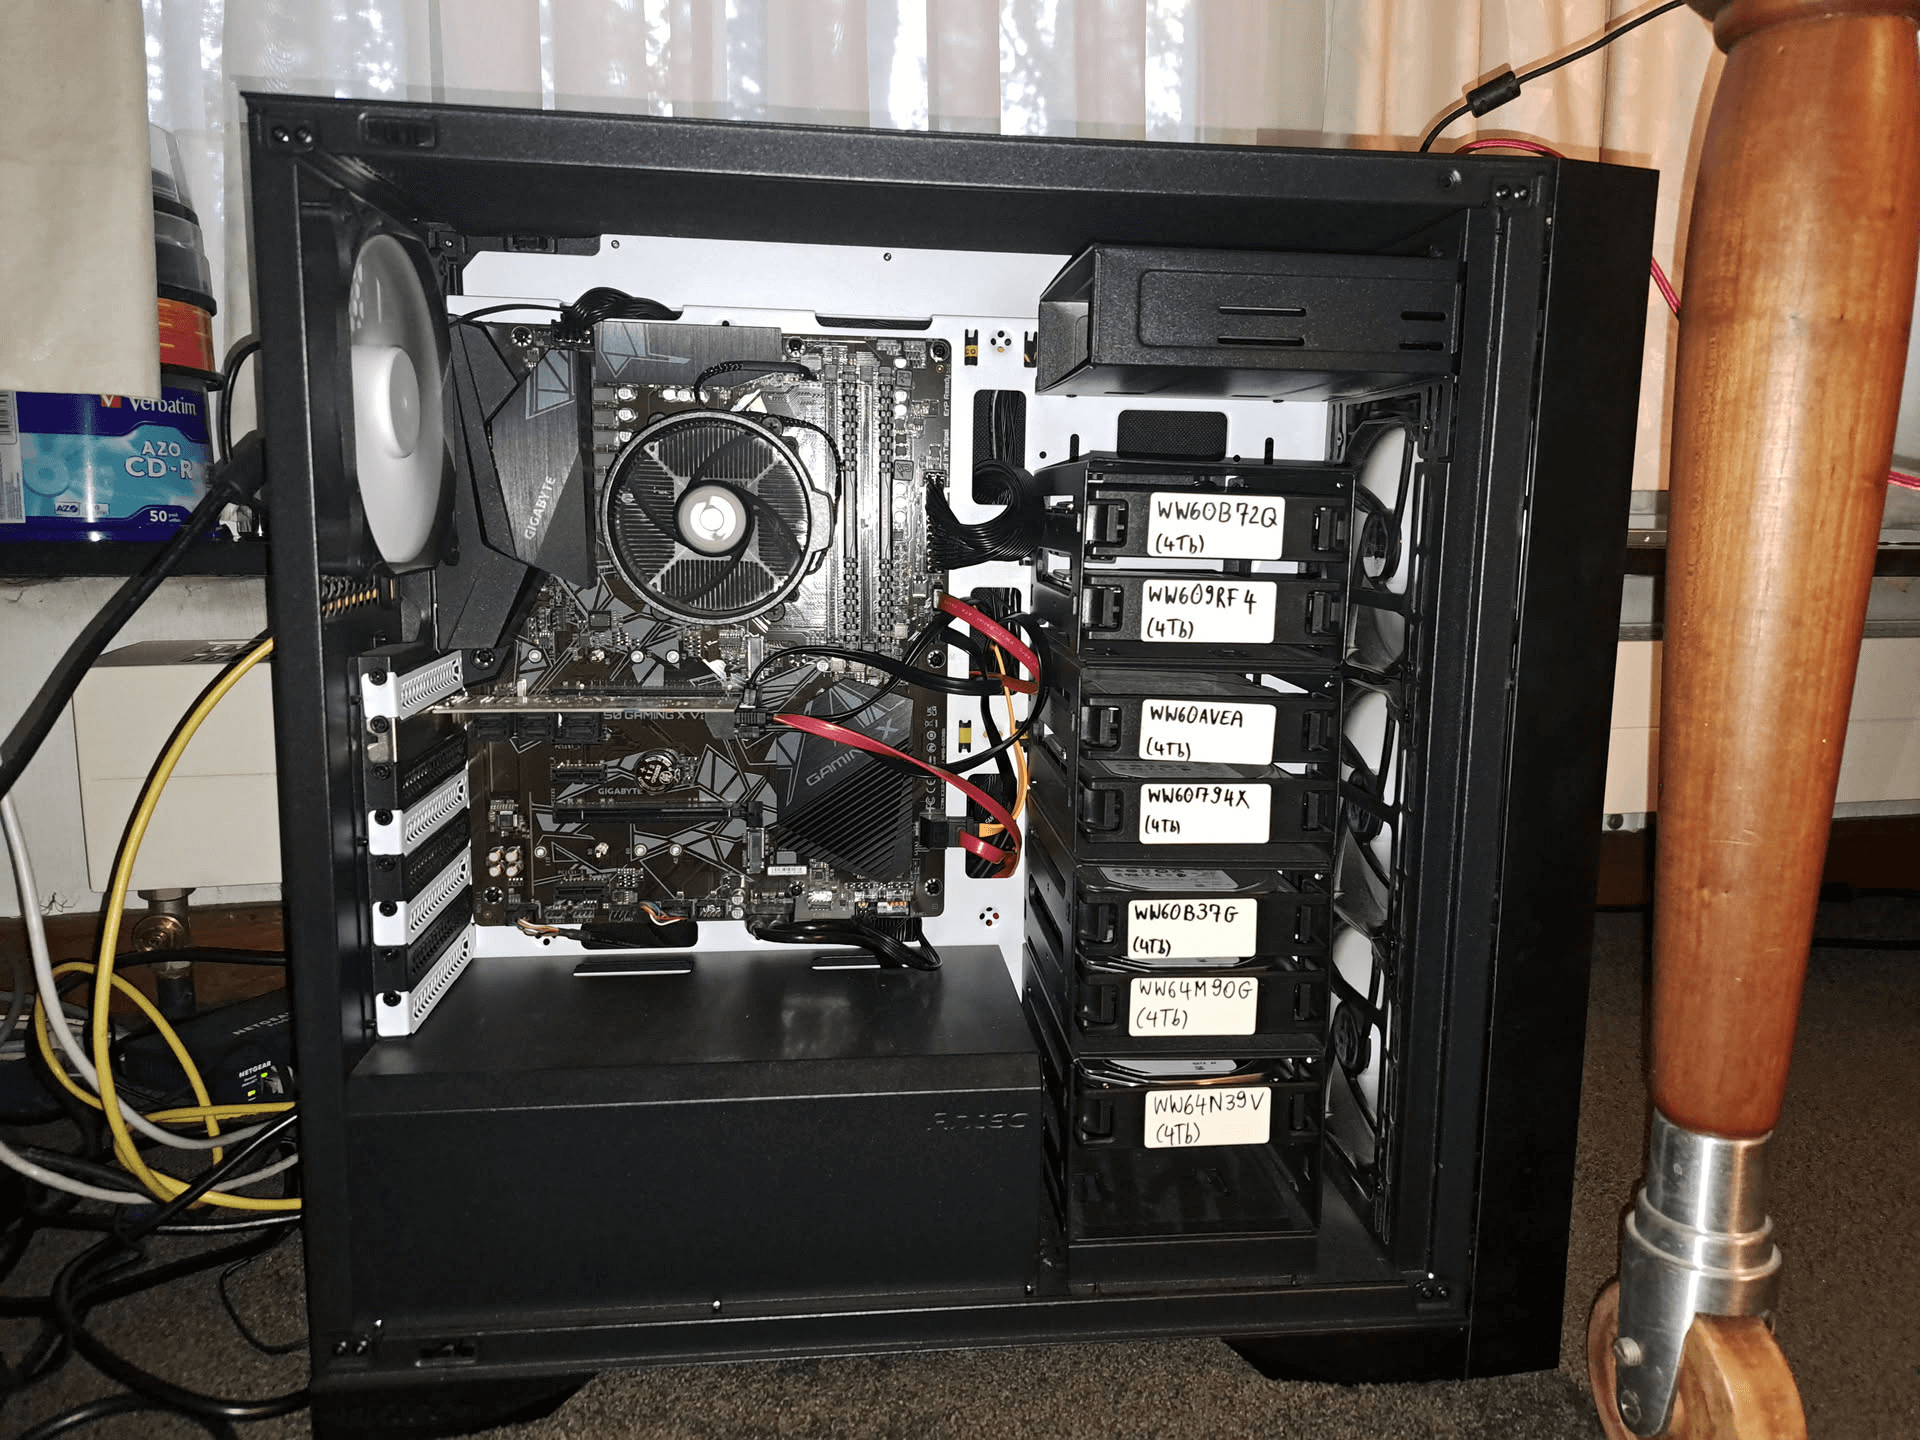
| CPU | AMD Ryzen 5 5600G |
| GPU | Geïntegreerde grafische kaart (AMD Radeon Vega Series) |
| Geheugen | 2x8GiB (16GiB) Corsair DDR4 Vengeance LPX 3200 |
| Voeding | Shark WPM Gold ZERO 750W |
| Moederbord | Gigabyte B550 GAMING X v2 B550 |
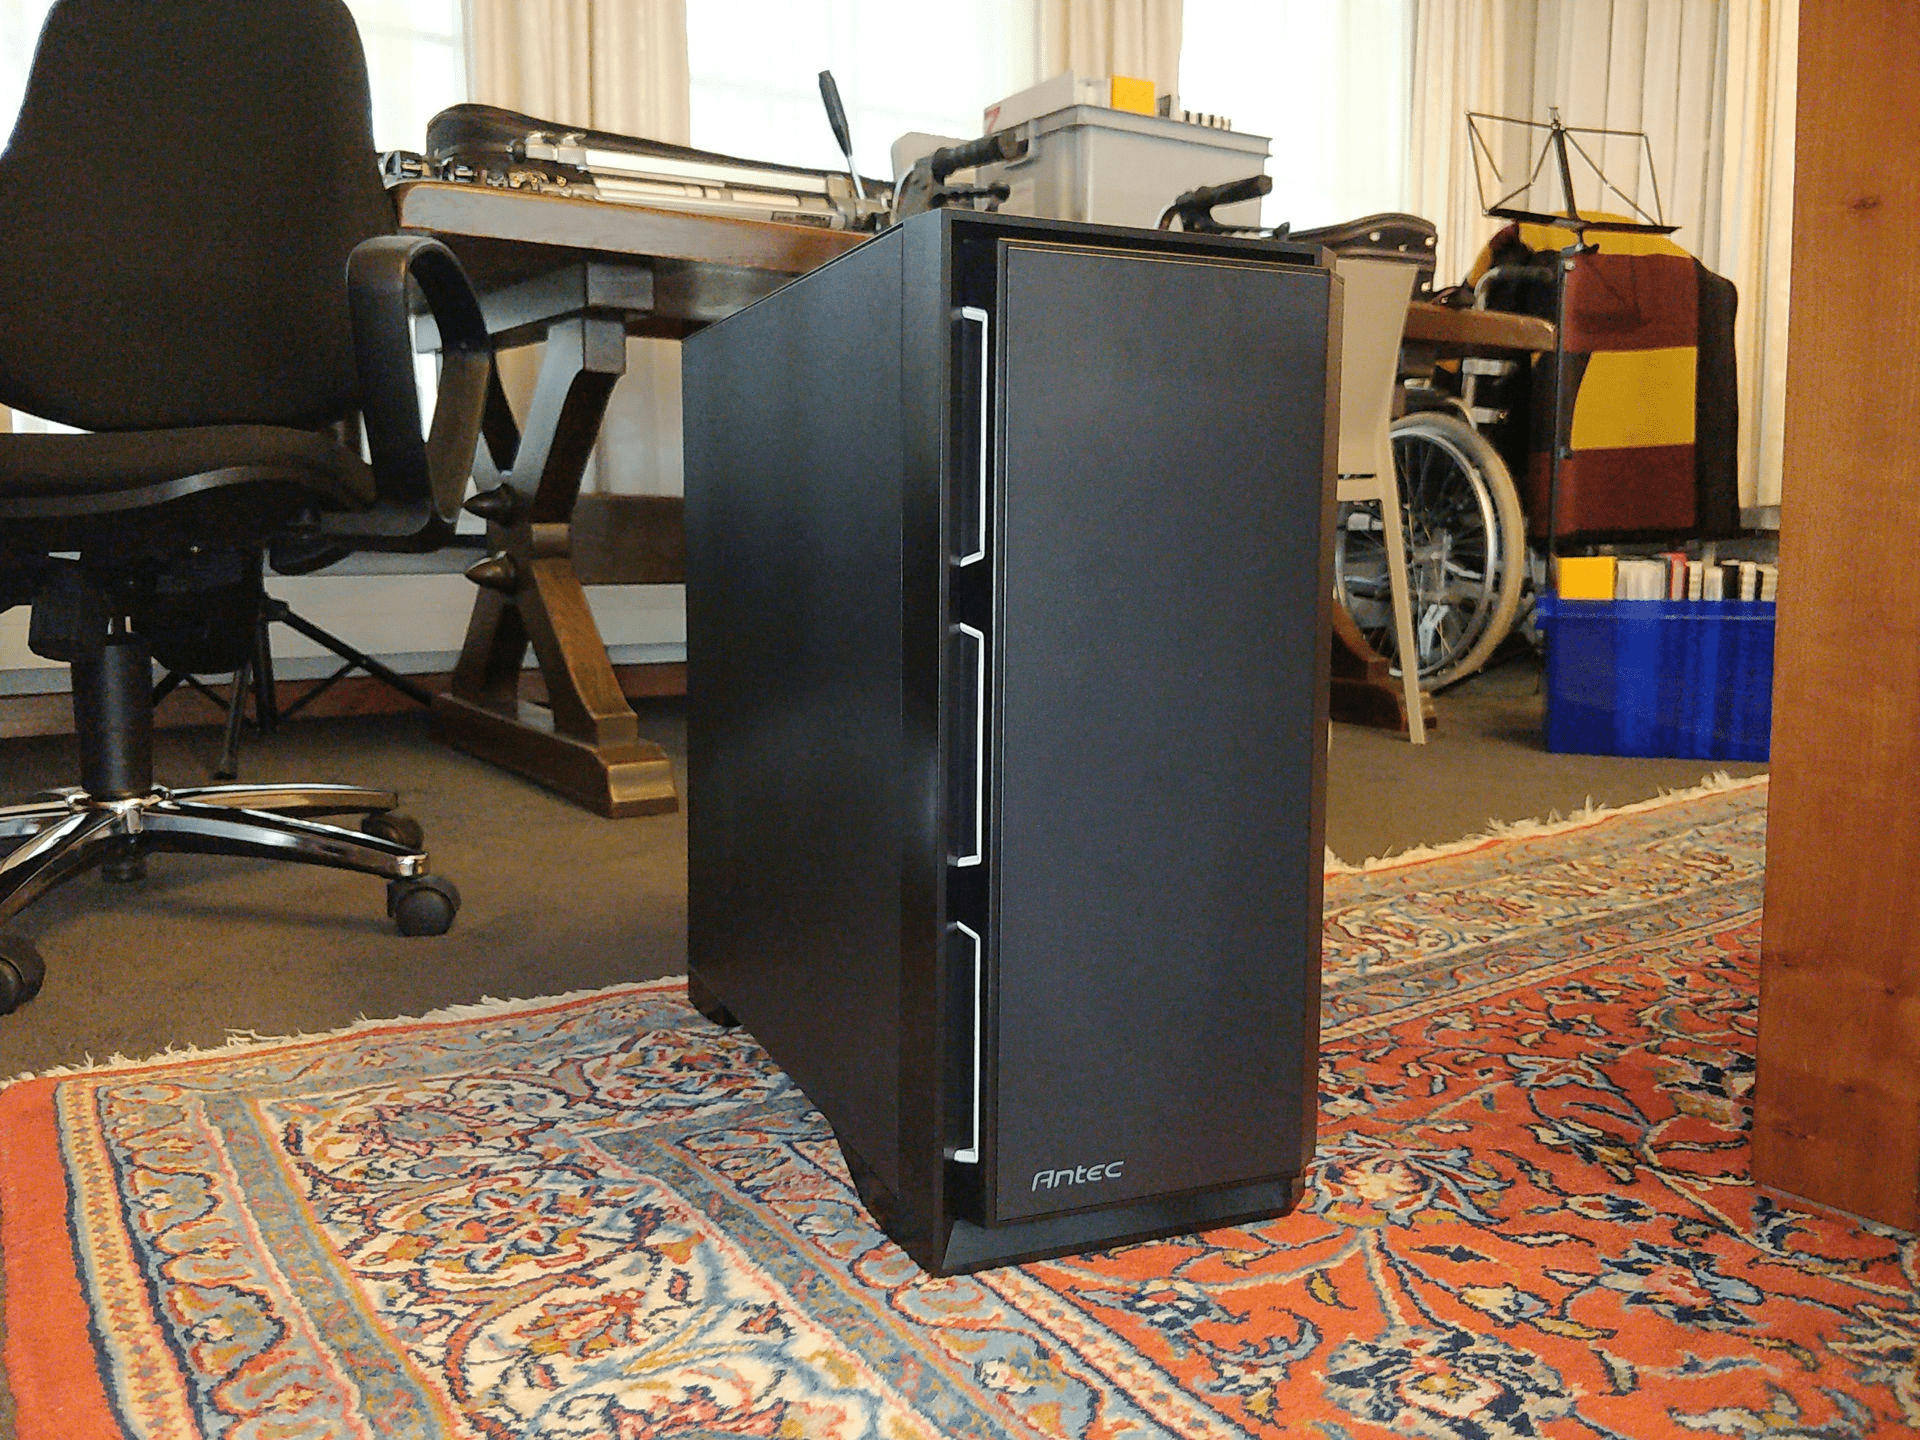
| Behuizing | Antec P101 Silent Midi Tower |
| SATA-uitbreidingskaart | Startech.com 10-poorts SATA PCIe-uitbreidingskaart 6Gbps |
Schijven
Crucial MX500 3D NAND SATA 2.5” Interne SSD (CT500MX500SSD1) waarschijnlijk
7x Seagate HDD NAS 3.5” 4TB ST-4000VN006 Ironwolf
- Fysieke configuratie:
| Serienummer schijf | Capaciteit |
|---|---|
| WW60B72Q | 4TB |
| WW609RF4 | 4TB |
| WW60AVEA | 4TB |
| WW60794X | 4TB |
| WW60B37G | 4TB |
| WW64M90G | 4TB |
| WW64N39V | 4TB |
Poorten
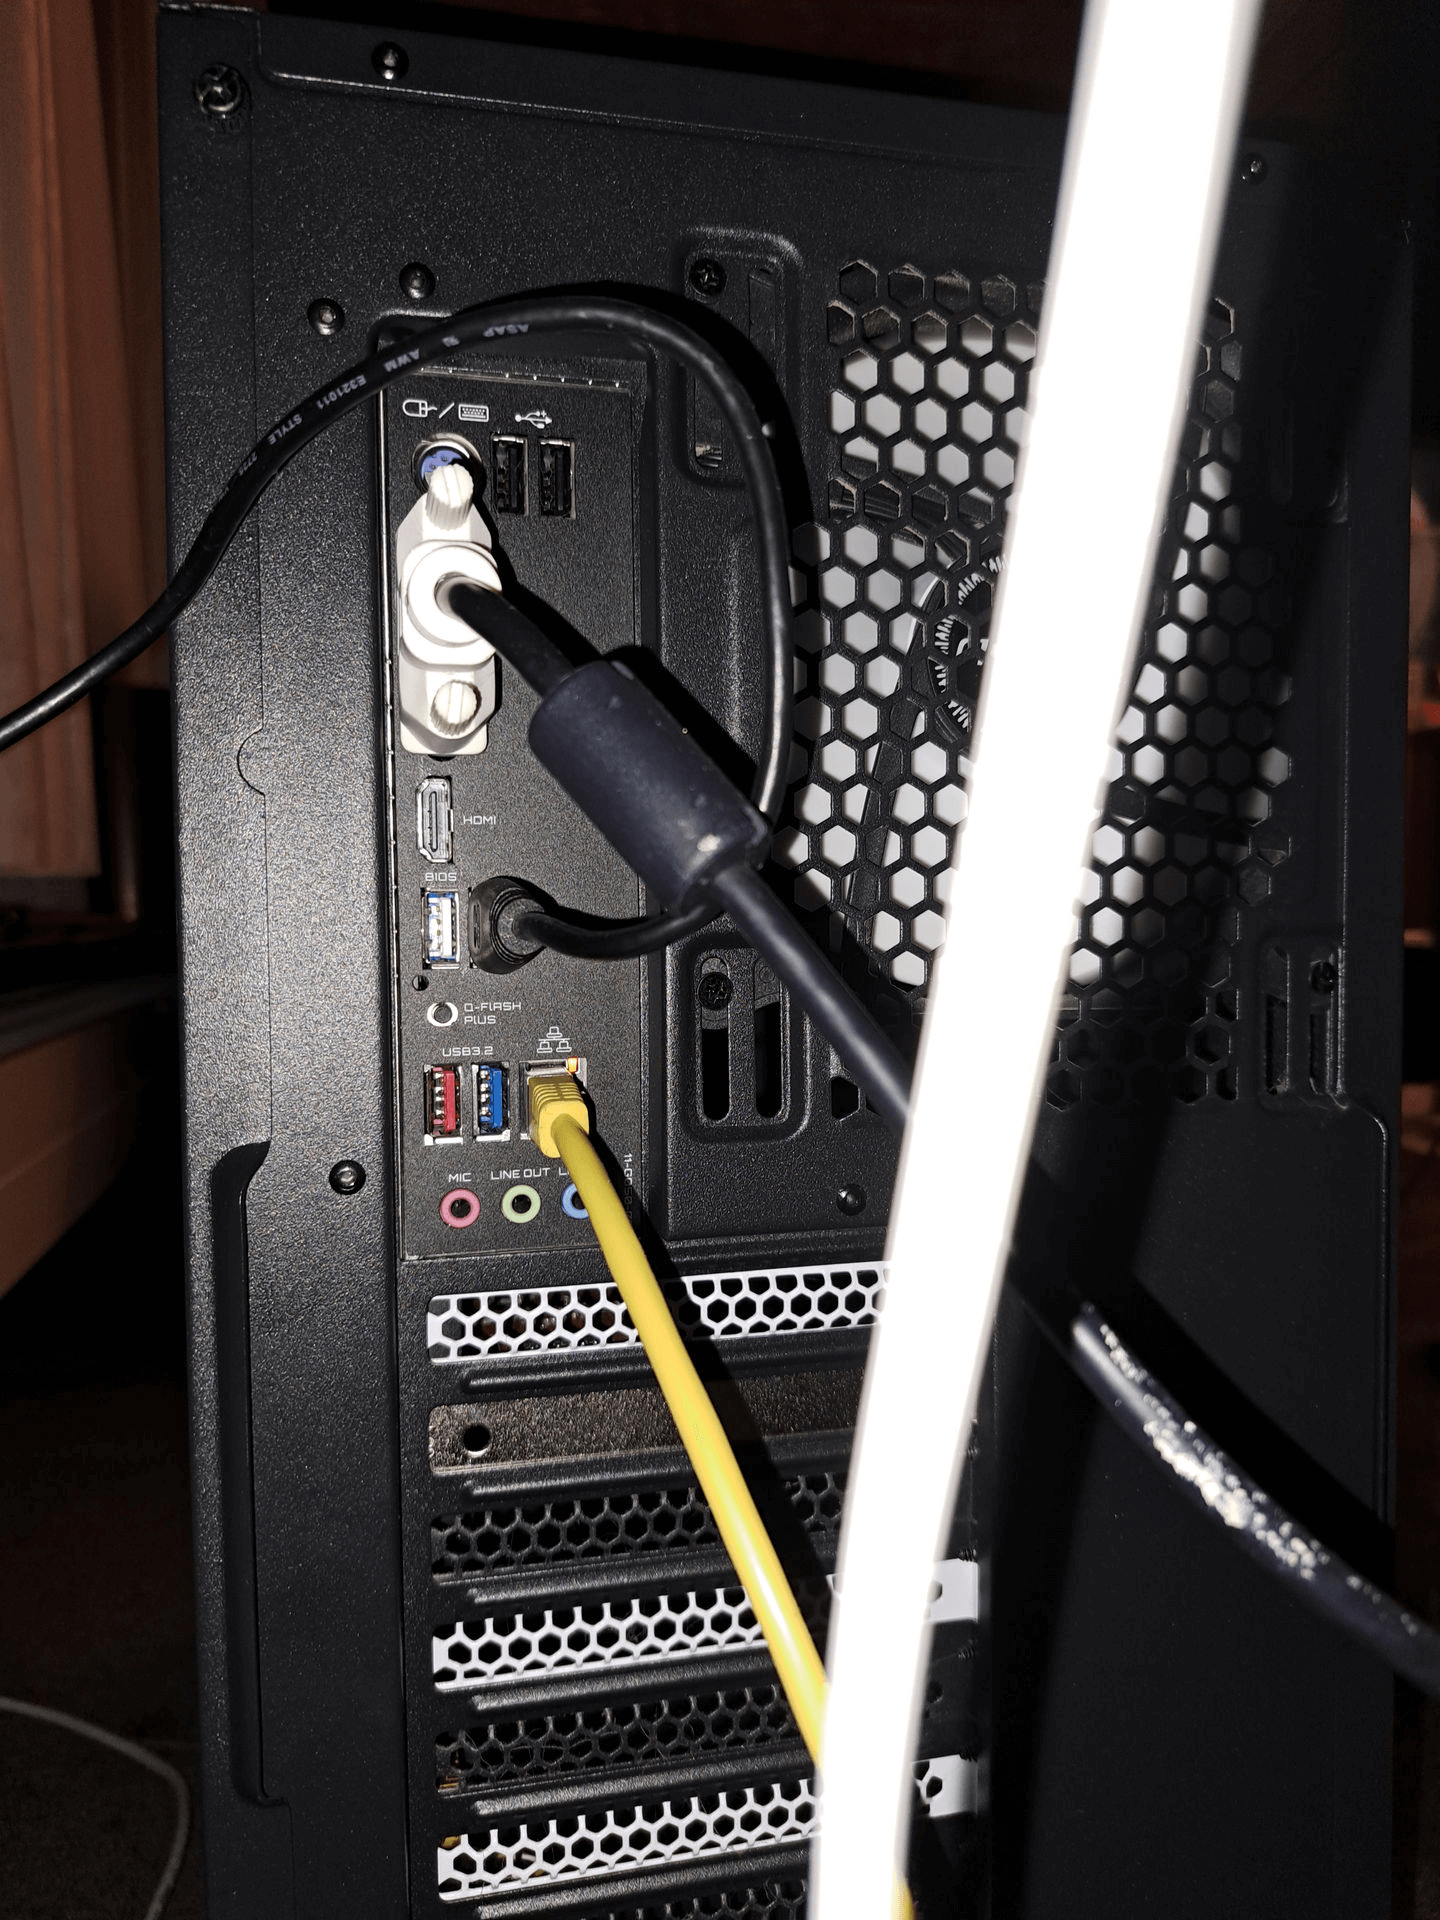
- Achterpaneel IO
- 2 * USB 2-poort
- 3 * USB 3.2-poort
- USB (bios flash) (waarschijnlijk USB 2)
- HDMI
- DVI-poort
- LAN-poort
- Microfoon
- Line out
- Line in
- Oude muis- en toetsenbordpoort
- Voorpaneel IO
- 2 * USB 2-poort
- 2 * USB 3-poort
- Koptelefoonaansluiting
- Microfoonaansluiting
Software
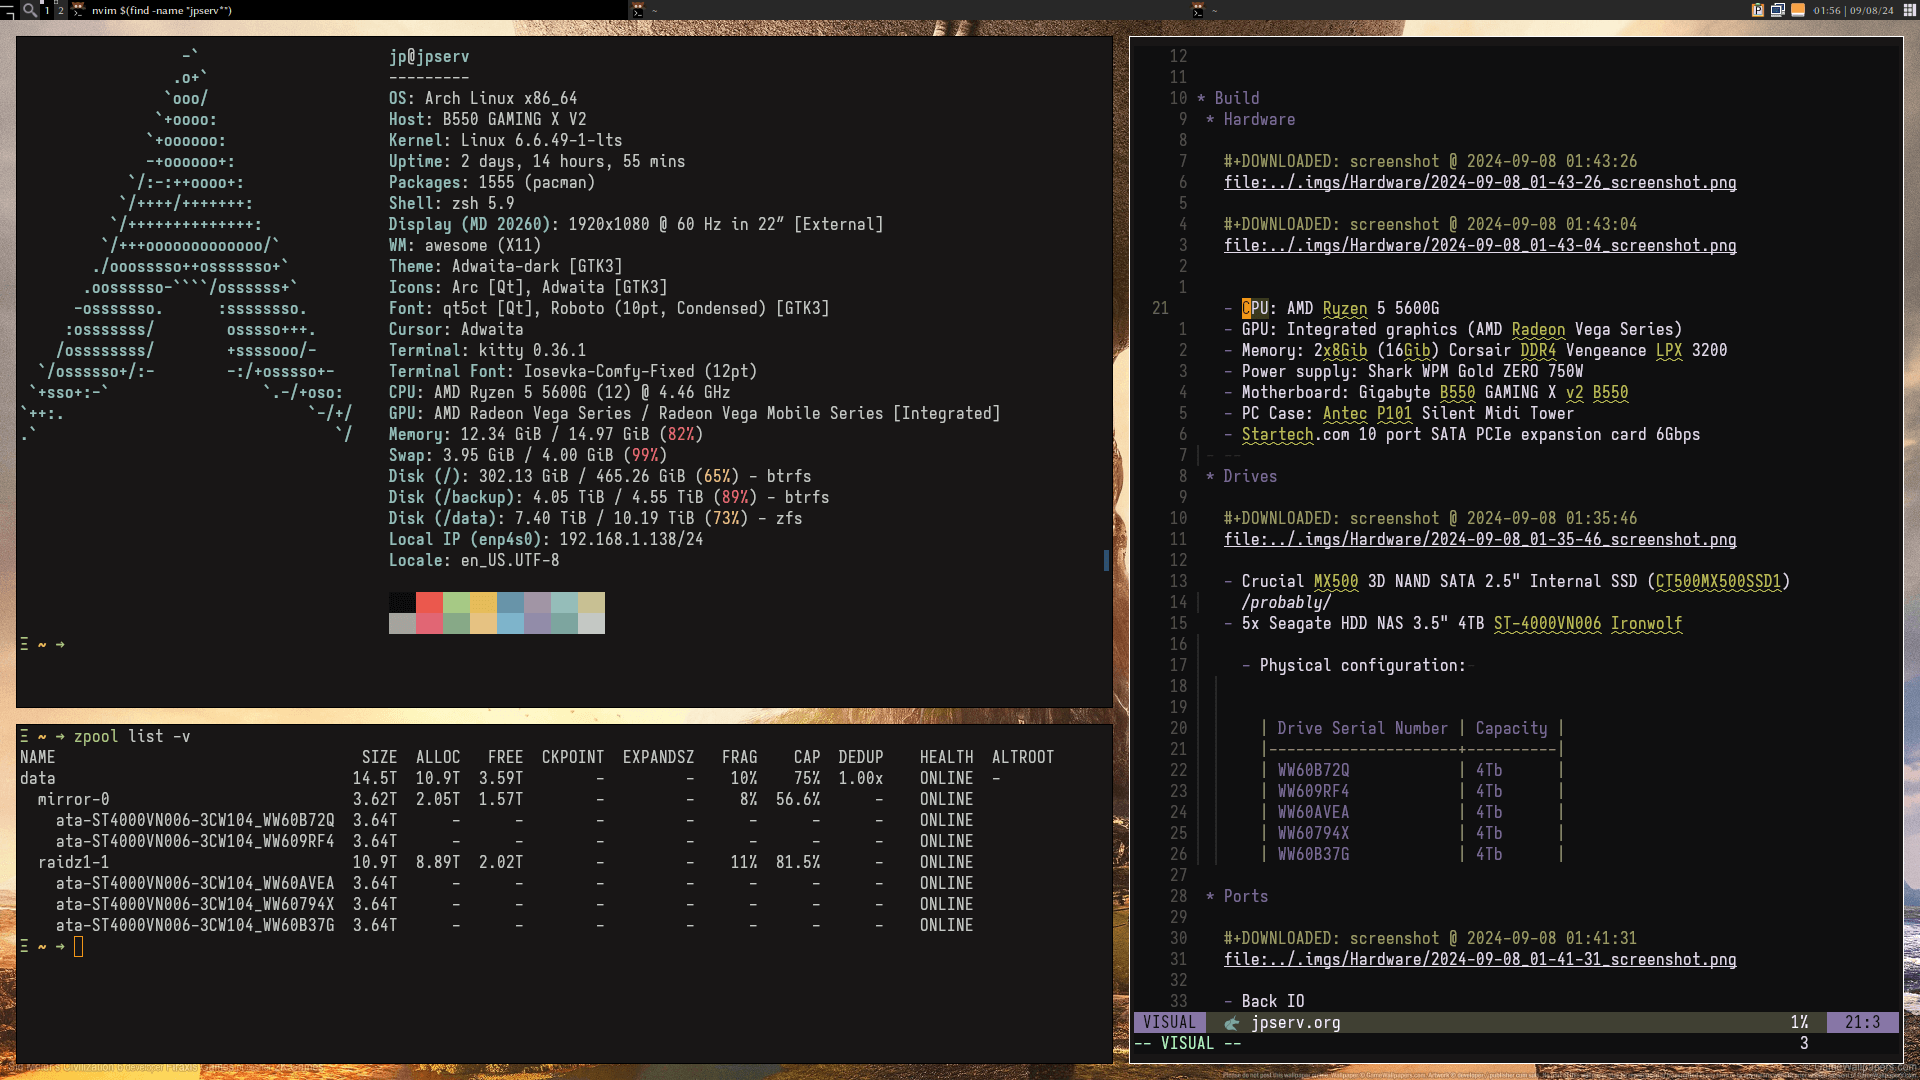
Besturingssysteem

Arch Linux
LTS kernel (beste voor compatibiliteit met ZFS kernelmodule)
4GiB SWAP
Locale:
en_US.UTF-8Display manager: SDDM
Display server: X11
Window manager: Awesome WM
Pakketbeheerder: pacman
AUR (repository met door de gemeenschap onderhouden pakketten)
- Installeren en updaten met yay
Hostnaam: jpserv (gedefinieerd in
/etc/hostname)Goede info op de ArchWiki
Ik had hardwareproblemen ondervonden op Ubuntu en Debian
Fstab
- Het Fstab-bestand wordt gebruikt om te definiëren hoe het systeem partities moet koppelen (mounten).
- Het is een zeer belangrijk bestand. Als je je root-bestandssysteem niet correct koppelt, zal de machine niet opstarten.
- het bevindt zich op
/etc/fstab - LET OP: ZFS-bestandssystemen (zoals /data) worden niet gedefinieerd in fstab, omdat ZFS een service heeft die ze koppelt.
## Static information about the filesystems.
## See fstab(5) for details.

## <file system> <dir> <type> <options> <dump> <pass>
## /dev/sdb2
UUID=f15c7196-cd62-422d-9d1d-f6cbd3f44834       /               btrfs           rw,relatime,space_cache=v2,subvolid=256,subvol=/@       0 0

## /dev/sdb1
UUID=4177-EEA0          /boot           vfat            rw,relatime,fmask=0022,dmask=0022,codepage=437,iocharset=ascii,shortname=mixed,utf8,errors=remount-ro   0 2

## /dev/sdb2
UUID=f15c7196-cd62-422d-9d1d-f6cbd3f44834       /.snapshots     btrfs           rw,relatime,space_cache=v2,subvolid=260,subvol=/@.snapshots     0 0

## /dev/sdb2
UUID=f15c7196-cd62-422d-9d1d-f6cbd3f44834       /home           btrfs           rw,relatime,space_cache=v2,subvolid=257,subvol=/@home   0 0

## /dev/sdb2
UUID=f15c7196-cd62-422d-9d1d-f6cbd3f44834       /var/cache/pacman/pkg   btrfs           rw,relatime,space_cache=v2,subvolid=259,subvol=/@pkg    0 0

## /dev/sdb2
UUID=f15c7196-cd62-422d-9d1d-f6cbd3f44834       /var/log        btrfs           rw,relatime,space_cache=v2,subvolid=258,subvol=/@log    0 0

## btrfs backup pool
UUID="01bccb10-3911-49c9-a6a4-978818bb3471"  /backup     btrfs     rw,exec,subvolid=256     0    0
Bootloader
- Grub bootloader
- Je wijzigt het bestand:
/etc/default/gruben om de wijzigingen te installeren voer je uit:sudo grub-mkconfig /boot/grub/grub.cfg
## GRUB boot loader configuration

GRUB_DEFAULT=saved
GRUB_TIMEOUT=3
GRUB_DISTRIBUTOR="Arch"
GRUB_CMDLINE_LINUX_DEFAULT="loglevel=3 quiet"
GRUB_CMDLINE_LINUX="rootfstype=btrfs"

## Preload both GPT and MBR modules so that they are not missed
GRUB_PRELOAD_MODULES="part_gpt part_msdos"

## Uncomment to enable booting from LUKS encrypted devices
##GRUB_ENABLE_CRYPTODISK=y

## Set to 'countdown' or 'hidden' to change timeout behavior,
## press ESC key to display menu.
GRUB_TIMEOUT_STYLE=menu

## Uncomment to use basic console
GRUB_TERMINAL_INPUT=console

## Uncomment to disable graphical terminal
##GRUB_TERMINAL_OUTPUT=console

## The resolution used on graphical terminal
## note that you can use only modes which your graphic card supports via VBE
## you can see them in real GRUB with the command `videoinfo'
GRUB_GFXMODE=auto

## Uncomment to allow the kernel use the same resolution used by grub
GRUB_GFXPAYLOAD_LINUX=keep

## Uncomment if you want GRUB to pass to the Linux kernel the old parameter
## format "root=/dev/xxx" instead of "root=/dev/disk/by-uuid/xxx"
##GRUB_DISABLE_LINUX_UUID=true

## Uncomment to disable generation of recovery mode menu entries
GRUB_DISABLE_RECOVERY=true

## Uncomment and set to the desired menu colors.  Used by normal and wallpaper
## modes only.  Entries specified as foreground/background.
##GRUB_COLOR_NORMAL="light-blue/black"
##GRUB_COLOR_HIGHLIGHT="light-cyan/blue"

## Uncomment one of them for the gfx desired, a image background or a gfxtheme
##GRUB_BACKGROUND="/path/to/wallpaper"
##GRUB_THEME="/path/to/gfxtheme"

## Uncomment to get a beep at GRUB start
##GRUB_INIT_TUNE="480 440 1"

## Uncomment to make GRUB remember the last selection. This requires
## setting 'GRUB_DEFAULT=saved' above.
GRUB_SAVEDEFAULT=true

## Uncomment to disable submenus in boot menu
##GRUB_DISABLE_SUBMENU=y

## Probing for other operating systems is disabled for security reasons. Read
## documentation on GRUB_DISABLE_OS_PROBER, if still want to enable this
## functionality install os-prober and uncomment to detect and include other
## operating systems.
##GRUB_DISABLE_OS_PROBER=false
Bestandssystemen
/ (root)
- Apparaat: Crucial MX500 3D NAND SATA 2.5” Interne SSD (CT500MX500SSD1)
| Naam | Grootte | Bestandssysteem | Koppelpunten(s) |
|---|---|---|---|
| Boot | 511MiB | FAT32 | /boot |
| Primair | 465.26GiB | BTRFS | /, /home, /.snapshots, /var/cache/pacman/pkg, /var/lib/docker/btrfs, /var/log |
/data
Informatie

ZFS Bestandssysteem
Systemd Services om automatische snapshots, scrubbing (data-integriteitscontrole), monitoring en meldingen in te schakelen
7x Seagate HDD NAS 3.5” 4TB ST-4000VN006 Ironwolf
ZFS bestandssysteem
1
Zpool3
VDEVs
| mirror-0 | raidz1-1 | mirror-2 |
|---|---|---|
| ata-ST4000VN006-3CW104~WW60B72Q~ | ata-ST4000VN006-3CW104~WW60AVEA~ | ata-ST4000VN006-3CW104~WW64M90G~ |
| ata-ST4000VN006-3CW104~WW609RF4~ | ata-ST4000VN006-3CW104~WW60794X~ | ata-ST4000VN006-3CW104~WW64N39V~ |
| / | / | ata-ST4000VN006-3CW104~WW60B37G~ |
          pool: data
         state: ONLINE
          scan: scrub repaired 0B in 19:52:20 with 0 errors on Mon Nov  4 19:52:21 2024
        config:

                NAME                                STATE     READ WRITE CKSUM
                data                                ONLINE       0     0     0
                 mirror-0                           ONLINE       0     0     0
                   ata-ST4000VN006-3CW104_WW60B72Q  ONLINE       0     0     0
                   ata-ST4000VN006-3CW104_WW609RF4  ONLINE       0     0     0
                 raidz1-1                           ONLINE       0     0     0
                   ata-ST4000VN006-3CW104_WW60AVEA  ONLINE       0     0     0
                   ata-ST4000VN006-3CW104_WW60794X  ONLINE       0     0     0
                   ata-ST4000VN006-3CW104_WW60B37G  ONLINE       0     0     0
                 mirror-2                           ONLINE       0     0     0
                   ata-ST4000VN006-3CW104_WW64M90G  ONLINE       0     0     0
                   ata-ST4000VN006-3CW104_WW64N39V  ONLINE       0     0     0

        errors: No known data errors

        NAME   SIZE  ALLOC   FREE  CKPOINT  EXPANDSZ   FRAG    CAP  DEDUP    HEALTH  ALTROOT
        data  18.2T  12.3T  5.82T        -         -    17%    67%  1.00x    ONLINE  -
Services
Automatische Snapshots
- ZFS snapshots zijn alleen-lezen kopieën van een ZFS bestandssysteem
- Je kunt teruggaan naar een vorige snapshot met:
zfs rollback vault@snapshot-naam - Je kunt door de bestanden van elke snapshot bladeren op:
koppelpunt_van_zfs_pool/.zfs/snapshot/ - AUR Pakket: zfs-auto-snapshot
- Ik heb ingeschakeld: -
zfs-auto-snapshot-hourly.timer zfs-auto-snapshot-weekly.timer
# Get an overview of zfs snapshots
zfs list -r -t snapshot
Example output: NAME USED AVAIL REFER MOUNTPOINT
data@2024-07-29_22:24:29 39.8G - 5.99T - data@2024-08-09_23:39:02
28.8G - 6.01T - data@znap_2024-08-11-2200_weekly 56.0G - 6.62T -
data@znap_2024-08-18-2200_weekly 14.5G - 7.09T -
data@znap_2024-08-25-2200_weekly 32.3G - 7.28T -
data@znap_2024-08-31-1200_hourly 100M - 7.27T -
data@znap_2024-08-31-1300_hourly 834K - 7.27T -
data@znap_2024-08-31-1400_hourly 36.2M - 7.27T -
data@znap_2024-08-31-1500_hourly 2.26M - 7.27T -
data@znap_2024-08-31-1600_hourly 1.39M - 7.27T -
data@znap_2024-08-31-1700_hourly 1.25M - 7.27T -
data@znap_2024-08-31-1800_hourly 709K - 7.27T -
data@znap_2024-08-31-1900_hourly 400K - 7.27T -
data@znap_2024-08-31-2000_hourly 794K - 7.27T -
data@znap_2024-08-31-2100_hourly 382K - 7.28T -
data@znap_2024-08-31-2200_hourly 998K - 7.28T -
data@znap_2024-08-31-2300_hourly 513K - 7.28T -
data@znap_2024-09-01-0000_hourly 638K - 7.28T -
data@znap_2024-09-01-0100_hourly 521K - 7.28T -
data@znap_2024-09-01-0200_hourly 2.42M - 7.28T -
data@znap_2024-09-01-0300_hourly 1.22M - 7.27T -
data@znap_2024-09-01-0400_hourly 612K - 7.28T -
data@znap_2024-09-01-0500_hourly 658K - 7.28T -
data@znap_2024-09-01-0600_hourly 596K - 7.28T -
data@znap_2024-09-01-0700_hourly 558K - 7.28T -
data@znap_2024-09-01-0800_hourly 624K - 7.28T -
data@znap_2024-09-01-0900_hourly 878K - 7.28T -
data@znap_2024-09-01-1000_hourly 2.16M - 7.28T -
data@znap_2024-09-01-1100_hourly 774K - 7.28T -Automatisch scrubben
- ZFS scrubbing lost datacorruptie op. Het wordt aanbevolen om dit regelmatig (wekelijks of maandelijks) uit te voeren.
- AUR Pakket: systemd-zpool-scrub
- Ingeschakeld met het commando: `sudo systemctl enable —now
zpool-scrub@data.timer`. Dit zal de opgegeven pool wekelijks scrubben. Via ZED word ik per e-mail op de hoogte gesteld.
ZED:
zed.service- Melden van belangrijke gebeurtenissen via E-mail
- Melden bij scrubben
- Je kunt de gebeurtenissen zien met het commando:
zpool events - Dit vereist dat het mail commando is ingesteld
- Configuratie
  ##
  #
  # zed.rc - ZEDLET configuration.
  ##
  # shellcheck disable=SC2034

  ##
  # Absolute path to the debug output file.
  #
  #ZED_DEBUG_LOG="/tmp/zed.debug.log"

  ##
  # Email address of the zpool administrator for receipt of notifications;
  #   multiple addresses can be specified if they are delimited by whitespace.
  # Email will only be sent if ZED_EMAIL_ADDR is defined.
  # Enabled by default; comment to disable.
  #
  ZED_EMAIL_ADDR="REPLACE_ZFS_ZED_EMAIL"

  ##
  # Name or path of executable responsible for sending notifications via email;
  #   the mail program must be capable of reading a message body from stdin.
  # Email will only be sent if ZED_EMAIL_ADDR is defined.
  #
  ZED_EMAIL_PROG="mail"

  ##
  # Command-line options for ZED_EMAIL_PROG.
  # The string @ADDRESS@ will be replaced with the recipient email address(es).
  # The string @SUBJECT@ will be replaced with the notification subject;
  #   this should be protected with quotes to prevent word-splitting.
  # Email will only be sent if ZED_EMAIL_ADDR is defined.
  # If @SUBJECT@ was omited here, a "Subject: ..." header will be added to notification
  #
  ZED_EMAIL_OPTS="-s '@SUBJECT@' @ADDRESS@"

  ##
  # Default directory for zed lock files.
  #
  ZED_LOCKDIR="/var/lock"

  ##
  # Minimum number of seconds between notifications for a similar event.
  #
  ZED_NOTIFY_INTERVAL_SECS=3600

  ##
  # Notification verbosity.
  #   If set to 0, suppress notification if the pool is healthy.
  #   If set to 1, send notification regardless of pool health.
  #
  ZED_NOTIFY_VERBOSE=1

  ##
  # Send notifications for 'ereport.fs.zfs.data' events.
  # Disabled by default, any non-empty value will enable the feature.
  #
  #ZED_NOTIFY_DATA=

  ##
  # Pushbullet access token.
  # This grants full access to your account -- protect it accordingly!
  #   <https://www.pushbullet.com/get-started>
  #   <https://www.pushbullet.com/account>
  # Disabled by default; uncomment to enable.
  #
  #ZED_PUSHBULLET_ACCESS_TOKEN=""

  ##
  # Pushbullet channel tag for push notification feeds that can be subscribed to.
  #   <https://www.pushbullet.com/my-channel>
  # If not defined, push notifications will instead be sent to all devices
  #   associated with the account specified by the access token.
  # Disabled by default; uncomment to enable.
  #
  #ZED_PUSHBULLET_CHANNEL_TAG=""

  ##
  # Slack Webhook URL.
  # This allows posting to the given channel and includes an access token.
  #   <https://api.slack.com/incoming-webhooks>
  # Disabled by default; uncomment to enable.
  #
  #ZED_SLACK_WEBHOOK_URL=""

  ##
  # Pushover token.
  # This defines the application from which the notification will be sent.
  #   <https://pushover.net/api#registration>
  # Disabled by default; uncomment to enable.
  # ZED_PUSHOVER_USER, below, must also be configured.
  #
  #ZED_PUSHOVER_TOKEN=""

  ##
  # Pushover user key.  This defines which user or group will receive
  # Pushover notifications.  <https://pushover.net/api#identifiers>
  # Disabled by default; uncomment to enable.  ZED_PUSHOVER_TOKEN,
  # above, must also be configured.
  #ZED_PUSHOVER_USER=""

  ##
  # Default directory for zed state files.
  #
  #ZED_RUNDIR="/var/run"

  ##
  # Turn on/off enclosure LEDs when drives get DEGRADED/FAULTED.  This works for
  # device mapper and multipath devices as well.  This works with JBOD enclosures
  # and NVMe PCI drives (assuming they're supported by Linux in sysfs).
  #
  ZED_USE_ENCLOSURE_LEDS=1

  ##
  # Run a scrub after every resilver Disabled by default, 1 to enable
  # and 0 to disable.
  #ZED_SCRUB_AFTER_RESILVER=0

  ##
  # The syslog priority (e.g., specified as a "facility.level" pair).
  #
  ZED_SYSLOG_PRIORITY="daemon.notice"

  ##
  # The syslog tag for marking zed events.
  #
  ZED_SYSLOG_TAG="zed"

  ##
  # Which set of event subclasses to log By default, events from all
  # subclasses are logged.  If ZED_SYSLOG_SUBCLASS_INCLUDE is set,
  # only subclasses matching the pattern are logged. Use the pipe
  # symbol (|) or shell wildcards (*, ?) to match multiple
  # subclasses.  Otherwise, if ZED_SYSLOG_SUBCLASS_EXCLUDE is set,
  # the matching subclasses are excluded from logging.
  #ZED_SYSLOG_SUBCLASS_INCLUDE="checksum|scrub_*|vdev.*"
  ZED_SYSLOG_SUBCLASS_EXCLUDE="history_event"

  ##
  # Use GUIDs instead of names when logging pool and vdevs Disabled
  # by default, 1 to enable and 0 to disable.
  #ZED_SYSLOG_DISPLAY_GUIDS=1

  ##
  # Power off the drive's slot in the enclosure if it becomes
  # FAULTED.  This can help silence misbehaving drives.  This assumes
  # your drive enclosure fully supports slot power control via sysfs.
  #ZED_POWER_OFF_ENCLOSURE_SLOT_ON_FAULT=1

  ##
  # Ntfy topic This defines which topic will receive the ntfy
  # notification.  <https://docs.ntfy.sh/publish/> Disabled by
  # default; uncomment to enable.
  #ZED_NTFY_TOPIC=""

  ##
  # Ntfy access token (optional for public topics) This defines an
  # access token which can be used to allow you to authenticate when
  # sending to topics <https://docs.ntfy.sh/publish/#access-tokens>
  # Disabled by default; uncomment to enable.
  #ZED_NTFY_ACCESS_TOKEN=""

  ##
  # Ntfy Service URL This defines which service the ntfy call will be
  # directed toward <https://docs.ntfy.sh/install/> https://ntfy.sh
  # by default; uncomment to enable an alternative service url.
  #ZED_NTFY_URL="https://ntfy.sh"
Docker
- Ik implementeer veel services met Docker containers.
- Ik geef de voorkeur aan het gebruik van docker compose om containers op een declaratieve manier te definiëren.
- Ik sla de meeste Docker-containerconfiguraties en gerelateerde metadata en cache op in de locatie:
/home/jp/docker/- Ik heb de meeste configuraties van de services in dit document in de juiste sectie ingevoegd.
Netwerken
- Beheerd door
NetworkManager.service - Geconfigureerd statisch IP-adres:
192.168.1.138 - Ethernet-interface:
enp4s0 - met het commando
nmtui
VPN

Service inschakelen:
tailscaled.serviceTailscale-adres:
100.115.150.80Gekoppeld aan mijn Google-account
-
- implementeert eenvoudige DNS
- eenvoudig delen met andere gebruikers
- veel cross-platform clients!
- OAuth-authenticatie (ik heb het ingesteld met Google)
- mooie en makkelijk te gebruiken portal voor beheerders
- genereus gratis niveau
VPN-tunnel gebaseerd op Wireguard
- UDP-poorten (in plaats van
TCP) - gaat door Firewall (belangrijk voor mijn thuistoepassing)
- UDP-poorten (in plaats van
Monitoring
Monit
- schakel
monit.servicein - E-mailnotificaties
- Melden bij overmatig resourcegebruik (RAM, CPU-belasting, …)
- Melden bij bijna vol bestandssysteem
- Controleren of ping naar back-upserver (
orangepi) mogelijk is - Controleren of uptime kuma draait (een andere, gebruiksvriendelijkere monitoring service)
Configuratie
- Locatie:
/etc/monitrc
############################################################################### ## Monit control file ############################################################################### ## ## Comments begin with a '#' and extend through the end of the line. Keywords ## are case insensitive. All path's MUST BE FULLY QUALIFIED, starting with '/'. ## ## Below you will find examples of some frequently used statements. For ## information about the control file and a complete list of statements and ## options, please have a look in the Monit manual. ## ## ############################################################################### ## Global section ############################################################################### ## ## Start Monit in the background (run as a daemon): # set daemon 15 # check services at 30 seconds intervals with start delay 60 # optional: delay the first check by 4-minutes (by # # default Monit check immediately after Monit start) # # ## Set syslog logging. If you want to log to a standalone log file instead, ## specify the full path to the log file # set log syslog # # ## Set the location of the Monit lock file which stores the process id of the ## running Monit instance. By default this file is stored in $HOME/.monit.pid # # set pidfile /var/run/monit.pid # ## Set the location of the Monit id file which stores the unique id for the ## Monit instance. The id is generated and stored on first Monit start. By ## default the file is placed in $HOME/.monit.id. # # set idfile /var/.monit.id # ## Set the location of the Monit state file which saves monitoring states ## on each cycle. By default the file is placed in $HOME/.monit.state. If ## the state file is stored on a persistent filesystem, Monit will recover ## the monitoring state across reboots. If it is on temporary filesystem, the ## state will be lost on reboot which may be convenient in some situations. # # set statefile /var/.monit.state # # ## Set limits for various tests. The following example shows the default values: ## # set limits { # programOutput: 512 B, # check program's output truncate limit # sendExpectBuffer: 256 B, # limit for send/expect protocol test # fileContentBuffer: 512 B, # limit for file content test # httpContentBuffer: 1 MB, # limit for HTTP content test # networkTimeout: 5 seconds # timeout for network I/O # programTimeout: 300 seconds # timeout for check program # stopTimeout: 30 seconds # timeout for service stop # startTimeout: 30 seconds # timeout for service start # restartTimeout: 30 seconds # timeout for service restart # execTimeout: 0 seconds # timeout for test action exec # } ## Set global SSL options (just most common options showed, see manual for ## full list). # # set ssl { # verify : enable, # verify SSL certificates (disabled by default but STRONGLY RECOMMENDED) # selfsigned : allow # allow self signed SSL certificates (reject by default) # } # # ## Set the list of mail servers for alert delivery. Multiple servers may be ## specified using a comma separator. If the first mail server fails, Monit ## will use the second mail server in the list and so on. By default Monit uses ## port 25 - it is possible to override this with the PORT option. # set mailserver smtp.gmail.com port 587 username "REPLACE_MONIT_EMAIL_ADDRESS" password "REPLACE_MONIT_EMAIL_PASSWORD" using tlsv12 with timeout 30 seconds # # ## By default Monit will drop alert events if no mail servers are available. ## If you want to keep the alerts for later delivery retry, you can use the ## EVENTQUEUE statement. The base directory where undelivered alerts will be ## stored is specified by the BASEDIR option. You can limit the queue size ## by using the SLOTS option (if omitted, the queue is limited by space ## available in the back end filesystem). # # set eventqueue # basedir /var/monit # set the base directory where events will be stored # slots 100 # optionally limit the queue size # # ## Send status and events to M/Monit (for more information about M/Monit ## see https://mmonit.com/). By default Monit registers credentials with ## M/Monit so M/Monit can smoothly communicate back to Monit and you don't ## have to register Monit credentials manually in M/Monit. It is possible to ## disable credential registration using the commented out option below. ## Though, if safety is a concern we recommend instead using https when ## communicating with M/Monit and send credentials encrypted. The password ## should be URL encoded if it contains URL-significant characters like ## ":", "?", "@". Default timeout is 5 seconds, you can customize it by ## adding the timeout option. # # set mmonit # http://monit:monit@192.168.1.10:8080/collector # # with timeout 30 seconds # Default timeout is 5 seconds # # and register without credentials # Don't register credentials # # with hostgroups [ "Virtual machines", Web ] # Member of M/Monit hostgroup # # ## Monit by default uses the following format for alerts if the mail-format ## statement is missing:: ## --8<-- ## set mail-format { ## from: Monit <monit@$HOST> ## subject: monit alert -- $EVENT $SERVICE ## message: $EVENT Service $SERVICE ## Date: $DATE ## Action: $ACTION ## Host: $HOST ## Description: $DESCRIPTION ## ## Your faithful employee, ## Monit ## } ## --8<-- ## ## You can override this message format or parts of it, such as subject ## or sender using the MAIL-FORMAT statement. Macros such as $DATE, etc. ## are expanded at runtime. For example, to override the sender, use: # # set mail-format { from: monit@foo.bar } # # ## You can set alert recipients whom will receive alerts if/when a ## service defined in this file has errors. Alerts may be restricted on ## events by using a filter as in the second example below. # set alert REPLACE_MONIT_EMAIL_ADDRESS # receive all alerts # ## Do not alert when Monit starts, stops or performs a user initiated action. ## This filter is recommended to avoid getting alerts for trivial cases. # # set alert your-name@your.domain not on { instance, action } # # ## Monit has an embedded HTTP interface which can be used to view status of ## services monitored and manage services from a web interface. The HTTP ## interface is also required if you want to issue Monit commands from the ## command line, such as 'monit status' or 'monit restart service' The reason ## for this is that the Monit client uses the HTTP interface to send these ## commands to a running Monit daemon. See the Monit Wiki if you want to ## enable SSL for the HTTP interface. # # set httpd port 2812 and # use address localhost # only accept connection from localhost (drop if you use M/Monit) # allow localhost # allow localhost to connect to the server and # allow admin:monit # require user 'admin' with password 'monit' #with ssl { # enable SSL/TLS and set path to server certificate # pemfile: /etc/ssl/certs/monit.pem #} # ## Monit can perform act differently regarding services previous state when ## going back in duty. By default, Monit will 'start' all services. Monit can ## also takes no action to start services in 'nostart' mode. Monit can try to ## restore the 'laststate' of the service when Monit was shutdown. # set onreboot start # start, nostart, laststart ############################################################################### ## Services ############################################################################### ## ## Check general system resources such as load average, cpu and memory ## usage. Each test specifies a resource, conditions and the action to be ## performed should a test fail. # check system $HOST if loadavg (1min) per core > 2 for 5 cycles then alert if loadavg (5min) per core > 1.5 for 10 cycles then alert if cpu usage > 95% for 3 cycles then alert # This calcaultes memory usage without cached and buffers and ZFS cache check program memory_usage with path "/home/jp/Code/scripts/monit/actual_memory_percentage.sh" if status > 85 then alert # Since I use uptime kuma to monitor some stuff I need to ensure that it is running check program uptime_kuma with path "/home/jp/Code/scripts/monit/is_uptime_kuma_running_docker.sh" if status != 0 then alert # # # # ## Check if a file exists, checksum, permissions, uid and gid. In addition ## to alert recipients in the global section, customized alert can be sent to ## additional recipients by specifying a local alert handler. The service may ## be grouped using the GROUP option. More than one group can be specified by ## repeating the 'group name' statement. # # check file apache_bin with path /usr/local/apache/bin/httpd # if failed checksum and # expect the sum 8f7f419955cefa0b33a2ba316cba3659 then unmonitor # if failed permission 755 then unmonitor # if failed uid "root" then unmonitor # if failed gid "root" then unmonitor # alert security@foo.bar on { # checksum, permission, uid, gid, unmonitor # } with the mail-format { subject: Alarm! } # group server # # ## Check that a process is running, in this case Apache, and that it respond ## to HTTP and HTTPS requests. Check its resource usage such as cpu and memory, ## and number of children. If the process is not running, Monit will restart ## it by default. In case the service is restarted very often and the ## problem remains, it is possible to disable monitoring using the TIMEOUT ## statement. This service depends on another service (apache_bin) which ## is defined above. # # check process apache with pidfile /usr/local/apache/logs/httpd.pid # start program = "/etc/init.d/httpd start" with timeout 60 seconds # stop program = "/etc/init.d/httpd stop" # if cpu > 60% for 2 cycles then alert # if cpu > 80% for 5 cycles then restart # if totalmem > 200.0 MB for 5 cycles then restart # if children > 250 then restart # if disk read > 500 kb/s for 10 cycles then alert # if disk write > 500 kb/s for 10 cycles then alert # if failed host www.tildeslash.com port 80 protocol http and request "/somefile.html" then restart # if failed port 443 protocol https with timeout 15 seconds then restart # if 3 restarts within 5 cycles then unmonitor # depends on apache_bin # group server # # ## Check filesystem permissions, uid, gid, space usage, inode usage and disk I/O. ## Other services, such as databases, may depend on this resource and an automatically ## graceful stop may be cascaded to them before the filesystem will become full and data ## lost. # check filesystem rootfs with path / if space usage > 90% then alert check filesystem backup with path /backup if space usage > 95% then alert check filesystem data with path /data if space usage > 90% then alert # check filesystem datafs with path /dev/sdb1 # start program = "/bin/mount /data" # stop program = "/bin/umount /data" # if failed permission 660 then unmonitor # if failed uid "root" then unmonitor # if failed gid "disk" then unmonitor # if space usage > 80% for 5 times within 15 cycles then alert # if space usage > 99% then stop # if inode usage > 30000 then alert # if inode usage > 99% then stop # if read rate > 1 MB/s for 5 cycles then alert # if read rate > 500 operations/s for 5 cycles then alert # if write rate > 1 MB/s for 5 cycles then alert # if write rate > 500 operations/s for 5 cycles then alert # if service time > 10 milliseconds for 3 times within 5 cycles then alert # group server # # ## Check a file's timestamp. In this example, we test if a file is older ## than 15 minutes and assume something is wrong if its not updated. Also, ## if the file size exceed a given limit, execute a script # # check file database with path /data/mydatabase.db # if failed permission 700 then alert # if failed uid "data" then alert # if failed gid "data" then alert # if timestamp > 15 minutes then alert # if size > 100 MB then exec "/my/cleanup/script" as uid dba and gid dba # # ## Check directory permission, uid and gid. An event is triggered if the ## directory does not belong to the user with uid 0 and gid 0. In addition, ## the permissions have to match the octal description of 755 (see chmod(1)). # # check directory bin with path /bin # if failed permission 755 then unmonitor # if failed uid 0 then unmonitor # if failed gid 0 then unmonitor # # ## Check a remote host availability by issuing a ping test and check the ## content of a response from a web server. Up to three pings are sent and ## connection to a port and an application level network check is performed. # check host orangepi with address 192.168.1.155 if failed ping then alert # # ## Check a network link status (up/down), link capacity changes, saturation ## and bandwidth usage. # # check network public with interface eth0 # if link down then alert # if changed link then alert # if saturation > 90% then alert # if download > 10 MB/s then alert # if total uploaded > 1 GB in last hour then alert # # ## Check custom program status output. # # check program myscript with path /usr/local/bin/myscript.sh # if status != 0 then alert # if content changed then alert # # ############################################################################### ## Includes ############################################################################### ## ## It is possible to include additional configuration parts from other files or ## directories. # # include /etc/monit.d/* #- en het script dat wordt gebruikt om het geheugengebruik te verkrijgen
- Ik had dit nodig omdat het ZFS-bestandssysteem veel geheugen gebruikt, wat niet echt wordt gebruikt. Als een ander programma het geheugen nodig heeft, zal ZFS het niet meer gebruiken. Daarom moet het niet worden meegeteld.
- locatie:
/home/jp/Code/scripts/monit/actual_memory_persentage.sh
#!/bin/bash # Get memory information mem_total=$(grep MemTotal /proc/meminfo | awk '{print $2}') mem_free=$(grep MemFree /proc/meminfo | awk '{print $2}') buffers=$(grep Buffers /proc/meminfo | awk '{print $2}') cached=$(grep "^Cached" /proc/meminfo | awk '{print $2}') sreclaimable=$(grep SReclaimable /proc/meminfo | awk '{print $2}') zfs_arc=$(cat /proc/spl/kstat/zfs/arcstats | awk '/size/ {print $3; exit}') zfs_arc_kb=$((zfs_arc / 1024)) # Calculate used memory (excluding ZFS ARC) mem_used=$((mem_total - mem_free - buffers - cached - sreclaimable - zfs_arc_kb)) # Calculate percentage mem_percentage=$(awk "BEGIN {printf "%.2f", $mem_used / $mem_total * 100}") echo $mem_percentage- Locatie:
Uptime Kuma
- Eenvoudige webinterface om de uptime van services te volgen
- Docker-integratie
- Netwerkpings
- E-mailnotificaties
Docker compose
# Simple docker-compose.yml
# You can change your port or volume location

services:
  uptime-kuma:
    # network_mode: "service:gluetun"
    image: louislam/uptime-kuma:1
    container_name: uptime-kuma
    volumes:
      - ./uptime-kuma-data:/app/data
      # needed to monitor docker containers
      - /var/run/docker.sock:/var/run/docker.sock
      ports:
        - 3002:3001  # <Host Port>:<Container Port>
        restart: always
Media
- Er zijn twee varianten van deze setup:
- Standaard: Elke service afzonderlijk geconfigureerd, gebruikmakend van het hostnetwerk (of standaard Docker-netwerkinstellingen)
- Gluetun: Stuur extern verkeer via een VPN. Voor gebruikers zou dit niets moeten beïnvloeden. Het is slechts een veiligheids-/privacymaatregel. Ik torrente alleen via deze setup.
- TRaSH Guides: Handige website met best practices en configuraties voor enkele van de volgende services.
Jellyfin

Open source mediaoplossing om media te bekijken
Metadata voor alles
Ondersteuning voor aangepaste mappen
Ondersteuning voor muziek
Cross-platform (Android, iOS, Web, …)
Goede community native mobiele clients (voorkeur voor mobiel kijken):
poort: 8096
Zorg ervoor dat je Transcoding configureert onder admin-instellingen -> Afspelen -> Transcoding
- gebruik Video Acceleration (VAAPI)
- apparaat:
/dev/dri/renderD128 - schakel decodering in voor
- h264
- hevc
- VC1
- HEVC 10 bit
- VP9 10 bit
- schakel hardware-encoding in
Ik had wat problemen met Jellyfin dat al mijn RAM in beslag nam toen het
Ik heb ook trickplay ingeschakeld. Het duurde lang om te genereren, maar nadat het klaar is, zal Jellyfin afbeeldingen tonen bij het scrubben.
miniatuurafbeeldingen genereerde voor lokale video’s. Het crashte mijn hele server meerdere keren. Ik heb dit opgelost door een paar dingen te doen:
Beperk containerresources (zie compose hieronder)
In Jellyfin admin-instellingen -> Algemeen -> Prestaties zet Parallelle bibliotheek scantaken limiet op 1
Docker compose
services:
  jellyfin:
    image: jellyfin/jellyfin
    container_name: jellyfin
    user: 1000:1000
    group_add:
      - "989" # Output of command: $ getent group render | cut -d: -f3
      - "985" # Output of command: $ getent group video | cut -d: -f3
      network_mode: 'host'
      volumes:
        - ./jellyfin_config:/config
        - ./jellyfin_cache:/cache
        - /data/media:/data/media
        - /data/other media/:/data/other media/
        devices:
          - /dev/dri/renderD128:/dev/dri/renderD128
          - /dev/kfd:/dev/kfd # Remove this device if you don't use the OpenCL tone-mapping
          environment:
            - ROC_ENABLE_PRE_VEGA=1
            restart: 'always'
            mem_swappiness: 0
            deploy:
              resources:
                limits:
                  cpus: 10.0 # limit cores (jellyfin can sometimes hang entire system when doing intensive stuff)
                  memory: 10000M
                  reservations:
                    memory: 7192M
Radarr
- Beheer van filmbibliotheek
- poort: 7878
Sonarr
- Beheer van tv-seriebibliotheek
- poort: 8989
Lidarr
- Downloaden van muziekbibliotheek
- poort: 8686
Bazarr
- Beheer van ondertitelbibliotheek
- poort: 6767
Gecombineerd compose-bestand
services:
  sonarr:
    image: lscr.io/linuxserver/sonarr:latest
    network_mode: host
    container_name: sonarr
    environment:
      - PUID=1000
      - PGID=1000
      - TZ=Europe/Brussels
      # ports:
      #   - 8989:8989
      volumes:
        - ./sonarr_config:/config
        - /data:/data
        restart: always
  radarr:
    image: lscr.io/linuxserver/radarr:latest
    network_mode: host
    container_name: radarr
    environment:
      - PUID=1000
      - PGID=1000
      - TZ=Europe/Brussels
      # ports:
      #   - 7878:7878
      volumes:
        - ./radarr_config:/config
        - /data:/data
        restart: always
  bazarr:
    image: lscr.io/linuxserver/bazarr:latest
    network_mode: host
    container_name: bazarr
    environment:
      - PUID=1000
      - PGID=1000
      - TZ=Europe/Brussels
      # ports:
      #   - 6767:6767
      volumes:
        - ./bazarr_config:/config
        - /data:/data
        restart: always
  lidarr:
    image: lscr.io/linuxserver/lidarr:latest
    network_mode: host
    container_name: lidarr
    environment:
      - PUID=1000
      - PGID=1000
      - TZ=Etc/UTC
      # ports:
      #   - 8686:8686
      volumes:
        - ./lidarr_config:/config
        - /data:/data
        restart: unless-stopped
Jellyseerr
- Platform voor gebruikers om films aan te vragen
- Integreert met Jellyfin, Sonarr en Radarr
- poort: 5055
Immich
- Bekijk en zoek afbeeldingen
- Gebruik metadata
- Machine learning (gezichtsherkenning, object zoeken, etc.)
- poort: 2283
Borg backup
- Database back-up
- Afbeeldingen back-up
    #!/bin/sh
    #IMMICH

    # Paths
    UPLOAD_LOCATION="/data/other media/immich"
    BACKUP_PATH="/backup/borg/immich"
    REMOTE_HOST="jp@192.168.1.155"
    REMOTE_BACKUP_PATH="/data/borg"
    EMAIL="REPLACE_IMMICH_BORG_BACKUP_EMAILS" # space or , separated list is possible

    # Initialize success flag
    SUCCESS=true

    # Temporary file to hold the output
    OUTPUT_FILE=$(mktemp)

    # Function to clean up the temporary file
    cleanup() {
        rm -f "$OUTPUT_FILE"
    }
    trap cleanup EXIT # run cleanup on clean exit.

    # Function to report the result
    report_result() {
        if [ $1 -eq 0 ]; then
            echo "🟢 SUCCESS: $2" | tee -a "$OUTPUT_FILE"
        else
            echo "🔴 FAILURE: $2" | tee -a "$OUTPUT_FILE"
            SUCCESS=false
        fi
    }

    ### Local

    # Backup Immich database
    printf "creating db dump -- %s\n" "$(date)" | tee -a "$OUTPUT_FILE"
    docker exec -t immich_postgres pg_dumpall --clean --if-exists --username=postgres > "$UPLOAD_LOCATION"/database-backup/immich-database.sql
    du -h "$UPLOAD_LOCATION"/database-backup/immich-database.sql | tee -a "$OUTPUT_FILE"

    # For deduplicating backup programs such as Borg or Restic, compressing the content can increase backup size by making it harder to deduplicate. If you are using a different program or still prefer to compress, you can use the following command instead:
    # docker exec -t immich_postgres pg_dumpall --clean --if-exists --username=postgres | /usr/bin/gzip --rsyncable > "$UPLOAD_LOCATION"/database-backup/immich-database.sql.gz

    ### Append to local Borg repository
    echo "borg create"
    borg create --stats --progress "$BACKUP_PATH/immich-borg::{now}" "$UPLOAD_LOCATION" --exclude "$UPLOAD_LOCATION"/thumbs/ --exclude "$UPLOAD_LOCATION"/encoded-video/
    echo "borg prune"
    borg prune --stats --keep-daily=4 --keep-weekly=3 --keep-monthly=3 "$BACKUP_PATH"/immich-borg
    echo "borg compact"
    borg compact --progress "$BACKUP_PATH"/immich-borg


    ### Append to remote Borg repository
    printf "\nborg create remote --  %s\n" "$(date)" | tee -a "$OUTPUT_FILE"
    borg create --stats "$REMOTE_HOST:$REMOTE_BACKUP_PATH/immich-borg::{now}" "$UPLOAD_LOCATION" --exclude "$UPLOAD_LOCATION"/thumbs/ --exclude "$UPLOAD_LOCATION"/encoded-video/ 2>&1 | tee -a "$OUTPUT_FILE"
    report_result $? "Backup creation"


    printf "\nborg prune remote -- %s\n" "$(date)" | tee -a "$OUTPUT_FILE"
    borg prune --stats --keep-weekly=4 --keep-monthly=3 "$REMOTE_HOST:$REMOTE_BACKUP_PATH"/immich-borg
    report_result $? "Backup pruning"

    printf "\nborg compact remote -- %s\n" "$(date)" | tee -a "$OUTPUT_FILE"
    borg compact "$REMOTE_HOST:$REMOTE_BACKUP_PATH"/immich-borg 2>&1 | tee -a "$OUTPUT_FILE"
    report_result $? "Backup compacting"


    # Final summary report
    if [ "$SUCCESS" = true ]; then
        printf "\n All backup operations completed successfully." | tee -a "$OUTPUT_FILE"
        # Send the output via email
        mail -s " BACKUP =IMMICH= " $(echo "$EMAIL" | tr ',' ' ') < "$OUTPUT_FILE"
    else
        printf "\n🔴 Attention required: One or more backup operations failed." | tee -a "$OUTPUT_FILE"
        mail -s "🔴 BACKUP =IMMICH= (attention)" $(echo "$EMAIL" | tr ',' ' ') < "$OUTPUT_FILE"
    fi
Calibre
- Beheer e-books
- native installatie (NIET DOCKER)
- start Calibre server via cron bij opstarten
@reboot calibre-server
Calibre server
- Website om boeken te lezen en te downloaden
- poort: 8080
Services
SSHD
- Als je wilt dat een machine zonder wachtwoord kan ssh’en naar deze server, kopieer dan de publieke sleutel van de nieuwe machine naar:
/home/jp/.ssh/authorized_keys
Reflector
- Arch Linux-updates worden gehost op servers die Mirrors worden genoemd. Deze kunnen veranderen. Het is belangrijk om deze up-to-date te houden en mirrors te gebruiken die dichtbij zijn. - Mirrors worden gedefinieerd in het bestand:
/etc/pacman.d/mirrorlist - Reflector is een service die de mirrorlist bijwerkt en sorteert op downloadsnelheid
- Geïnstalleerd via pakketbeheerder
- Schakel de service in (
sudo systemctl enable --now reflector.service)
- Configuratiebestand
- Bevindt zich op:
/etc/xdg/reflector/reflector.conf
- Bevindt zich op:
    # Reflector configuration file for the systemd service.
    #
    # Empty lines and lines beginning with "#" are ignored.  All other lines should
    # contain valid reflector command-line arguments. The lines are parsed with
    # Python's shlex modules so standard shell syntax should work. All arguments are
    # collected into a single argument list.
    #
    # See "reflector --help" for details.

    # Recommended Options

    # Set the output path where the mirrorlist will be saved (--save).
    --save /etc/pacman.d/mirrorlist

    # Select the transfer protocol (--protocol).
    --protocol https

    # Select the country (--country).
    # Consult the list of available countries with "reflector --list-countries" and
    # select the countries nearest to you or the ones that you trust. For example:
    --country France,Germany,Netherlands,Belgium,

    # Use only the  most recently synchronized mirrors (--latest).
    --latest 5

    # Sort the mirrors by synchronization time (--sort).
    --sort age
Syncthing
- Zeer snelle manier om mappen tussen apparaten te synchroniseren.
- Ik gebruik dit voor:
- Keepass-bestanden (wachtwoorden en
TOTF) - Telefoonback-ups
- Schoolbestanden
- Notities
- Agendasynchronisatie
- …
- Keepass-bestanden (wachtwoorden en
- Deze server fungeert als een centrale server.
- poort: 8384
- Lokaal geïnstalleerd (pacman)
- Ingeschakeld via gebruiker systemd service:
systemctl --user enable --now syncthing@jp.service - website
Nextcloud
- Zelf-gehoste Cloud
- Bestandsopslag (zoals Google Drive)
- Opslag van notities (Google Keep)
- Agenda
- …
- Momenteel geïnstalleerd via docker en op poort 2002
- website
Docker compose
volumes:
  nextcloud:
  db:

services:
  db:
    image: mariadb:10.6
    restart: always
    command: --transaction-isolation=READ-COMMITTED --log-bin=binlog --binlog-format=ROW
    volumes:
      - db:/var/lib/mysql
    environment:
      - MYSQL_ROOT_PASSWORD=REPLACE_NEXTCLOUD_DB_ROOT_PASSWORD
      - MYSQL_PASSWORD=REPLACE_NEXTCLOUD_DB_PASSWORD
      - MYSQL_DATABASE=nextcloud
      - MYSQL_USER=nextcloud

  app:
    image: nextcloud
    restart: always
    ports:
      - 2002:80
    links:
      - db
    volumes:
      - nextcloud:/var/www/html
    environment:
      - MYSQL_PASSWORD=REPLACE_NEXTCLOUD_DB_PASSWORD
      - MYSQL_DATABASE=nextcloud
      - MYSQL_USER=nextcloud
      - MYSQL_HOST=db
Cgit
- Eenvoudige website voor Git-server
- aparte git-gebruiker
- groepen: wheel, git
- Repos opgeslagen op
/srv/git
Config
- Configuratie voor Cgit
- Locatie:
/etc/cgitrc
#
# cgit config
#

# Following lines work with the above Apache config
css=/cgit-css/cgit.css
logo=/cgit-css/cgit.png

# Allow http transport git clone
#enable-http-clone=0

# if you do not want that webcrawler (like google) index your site
robots=noindex, nofollow

# Sort by recent
branch-sort="age"

# if cgit messes up links, use a virtual-root. For example, cgit.example.org/ has this value:
virtual-root=/cgit
source-filter=/usr/lib/cgit/filters/syntax-highlighting.py
formatter=HtmlFormatter(encoding='utf-8', style='vim')
readme=:README.md
readme=:readme.md
readme=:README
readme=:readme
readme=:README.txt
readme=:readme.txt
readme=:README.org
root-title=JP's git server!
root-desc=Hosting personal git repositories which aren't stored in the cloud, powered by Cgit
clone-url=git@jpserv:/srv/git/$CGIT_REPO_URL
max-stats=quarter
enable-index-links=1
enable-commit-graph=1
enable-log-filecount=1
enable-log-linecount=1
enable-blame=1
enable-http-clone=0
about-filter=/usr/lib/cgit/filters/about-formatting.sh
root-readme=/srv/http/about.html
scan-path=/srv/git/
Script
- Een script gemaakt om snel nieuwe repos op deze server aan te maken:
#!/usr/bin/env bash

SERVER_URL="http://jpserv/cgit/"

repo_root="/srv/git"
read -r -p "Enter repo name (without .git):  " name

echo "$name"

repo_path="$repo_root"/"$name".git
mkdir -p "$repo_path"
git init --bare "$repo_path"

read -r -p "Description: " description
if [[ "$description" != "" ]]; then
    echo "$description" > "$repo_path/description"
fi

echo "
Done.
- set remote url with: git remote add jpserv git@jpserv:$repo_path
- clone using: git clone git@jpserv:$repo_path
- view at: $SERVER_URL/$name.git
"
Cron
- Periodiek taken/scripts uitvoeren
Gebruiker
@reboot calibre-server
# org analyzer
# @reboot java -jar /home/jp/ORG-ANALYZER/org-analyzer-1.0.2.jar --host 0.0.0.0 --dontopen

# minecraft server
# @reboot cd /home/jp/Minecraft/ && java -Xmx1024M -Xms1024M -jar server.jar nogui

# every 5 minutes
# 0 * * * * /home/jp/Code/scripts/isa_blog_sync.sh

# This archives the aegis and keepass synced folders and syncs to google drive
# 0 5 * * * /home/jp/Code/scripts/cloud_backup.sh

0 2 * * * /home/jp/Code/scripts/borg/borg-backup-ons.sh
0 2 * * * /home/jp/Code/scripts/borg/borg-backup-music.sh
0 3 * * * /home/jp/Code/scripts/borg/borg-backup-handycam.sh
0 4 * * * /home/jp/Code/scripts/borg/borg-backup-louis.sh
0 4 * * * /home/jp/Code/scripts/borg/borg-backup-boeken.sh

# Run backup on VPS and copy to this server
0 5 * * * /home/jp/Code/scripts/vps_backup.sh

# Copy to important data to backup drive
0 6 * * 3 /home/jp/Code/scripts/data-backup.sh

# every 4 hours
0 */4 * * * /home/jp/Code/scripts/icalorg_auto.sh

# weekly friday (thursday night)
0 2 * * 5 /home/jp/Code/scripts/vso_repetitiecal.sh

# 25 min
*/25 * * * * emacs --script /home/jp/Code/scripts/agenda_export.el
Root
# reboot the server weekly
# 0 3 * * 0 reboot

# Refresh smart devices every month
0 0 1 * * update-smart-drivedb

# Daily borg immich backup (5 am)
0 5 * * * /home/jp/Code/scripts/immich/borg-backup.sh
VNC
Scherm delen (zoals remote desktop)
Gebruikmakend van
x11vncDe eenvoudigste manier die ik heb gevonden om een VNC-server direct te starten, is door ssh te gebruiken om in te loggen op deze server en het volgende commando uit te voeren:
sudo x11vnc -repeat -ncache 10 -display :0 -auth /var/run/sddm/$(sudo ls /var/run/sddm/)
KOSync
- Synchroniseer voortgang tussen KOreader apps (e-book reader)
- Repository
Docker compose
services:
  kosync:
    image: koreader/kosync:latest
    container_name: kosync
    restart: always
    ports:
      - 7200:7200   # https
      - 17200:17200 # http
      volumes:
        - ./logs/app:/app/koreader-sync-server/logs
        - ./logs/redis:/var/log/redis
        - ./data/redis:/var/lib/redis
Pi-hole
- DNS-server die advertenties blokkeert
- Aangezien ik de DNS-server voor mijn thuisnetwerk niet kan wijzigen, heb ik gewoon enkele apparaten waarbij ik handmatig de DNS-server instel op het IP-adres van deze server (geen poort vereist)
- Ik gebruik ook cloudflared als een versleutelde DNS proxy.
- Zonder dit had ik wat problemen met het gebruik van de pi-hole als DNS op Android vanwege Android private DNS
- website
Docker compose
services:
  cloudflared:
    image: crazymax/cloudflared:latest
    container_name: cloudflared
    ports:
      - "5053:5053/udp"
      - "49312:49312/tcp"
      environment:
        - "TZ=Europe/Brussels"
        - "TUNNEL_DNS_UPSTREAM=https://1.1.1.1/dns-query,https://1.0.0.1/dns-query"
        restart: always

        pihole:
          container_name: pihole
          image: pihole/pihole:latest
          depends_on:
            - cloudflared
            ports:
              - "53:53/tcp"
              - "53:53/udp"
              - "67:67/udp"
              - "8099:80/tcp"
              - "443:443/tcp"
              environment:
                TZ: 'Europe/Brusselss'
                WEBPASSWORD: 'REPLACE_PIHOLE_WEB_PASSWORD'
                DNS1: 'cloudflared#5053'
                DNS2: 'no'
                # Volumes store your data between container upgrades
                volumes:
                  - './pihole/etc-pihole/:/etc/pihole/'
                  - './pihole/etc-dnsmasq.d/:/etc/dnsmasq.d/'
                  # Recommended but not required (DHCP needs NET_ADMIN)
                  #   https://github.com/pi-hole/docker-pi-hole#note-on-capabilities
                  cap_add:
                    - NET_ADMIN
                    restart: always
Portainer
- Website om docker containers te beheren
- Ik gebruik voornamelijk de commandline om mijn containers te beheren, maar soms is deze GUI handig
- poort: 9443 (https)
- website
Samba
- Om mappen via het netwerk te delen gebruik ik samba (smb)
- Configuratie bevindt zich op:
/etc/samba/smb.conf
[global]
allow insecure wide links = yes

workgroup = WORKGROUP
server string = %h server (Samba, Arch)


log file = /var/log/samba/log.
max log size = 1000

logging = file

panic action = /usr/share/samba/panic-action %d

server role = standalone server

obey pam restrictions = yes
unix password sync = yes
passwd program = /usr/bin/passwd %u
passwd chat = *Entersnews*spassword:* %n\n *Retypesnews*spassword:* %n\n *passwordsupdatedssuccessfully* .

pam password change = yes

map to guest = bad user

[printers]
comment = All Printers
browseable = no
path = /var/spool/samba
printable = yes
guest ok = no
read only = yes
create mask = 0700

## Windows clients look for this share name as a source of downloadable
## printer drivers
[print$]
comment = Printer Drivers
path = /var/lib/samba/printers
browseable = yes
read only = yes
guest ok = no
## Uncomment to allow remote administration of Windows print drivers.
## You may need to replace 'lpadmin' with the name of the group your
## admin users are members of.
## Please note that you also need to set appropriate Unix permissions
## to the drivers directory for these users to have write rights in it
;   write list = root, @lpadmin

[data_share]
path = /data
readonly = no
## inherit permission = yes
follow symlinks = yes
wide links = yes
unix extensions = no


[photos_share]
path = /data/pictures
readonly = no
## inherit permission = yes
follow symlinks = yes
wide links = yes
unix extensions = no

## Enable the recycle bin
vfs object = recycle
recycle:repository = /data/pictures/.recycle/%U
recycle:touch = Yes
recycle:keeptree = Yes
recycle:versions = Yes
recycle:noversions = *.tmp,*.temp,*.o,*.obj,*.TMP,*.TEMP
recycle:exclude = *.tmp,*.temp,*.o,*.obj,*.TMP,*.TEMP
recycle:excludedir = /recycle,/.recycle,/tmp,/temp,/TMP,/TEMP


[handycam_share]
path = "/data/other media/handycam"
readonly = no
## inherit permission = yes
follow symlinks = yes
wide links = yes
unix extensions = no

## Enable the recycle bin
vfs object = recycle
recycle:repository = /data/other media/handycam/.recycle/%U
recycle:touch = Yes
recycle:keeptree = Yes
recycle:versions = Yes
recycle:noversions = *.tmp,*.temp,*.o,*.obj,*.TMP,*.TEMP
recycle:exclude = *.tmp,*.temp,*.o,*.obj,*.TMP,*.TEMP
recycle:excludedir = /recycle,/.recycle,/tmp,/temp,/TMP,/TEMP
Backups
- Gebruikmakend van Borg backup voor gededupliceerde (als er dubbele data is tussen backups wordt deze maar één keer opgeslagen) backups.
- Borg werkt ook over ssh
- Deze worden geback-upt naar mijn Orange Pi server in het andere gebouw.
- Een backup is een repository met archieven erin
- Belangrijke commando’s:
borg init: maak een nieuwe repository aanborg create: maak een nieuw archief aanborg prune: verwijder enkele archieven volgens regels (bijvoorbeeld bewaar 3 dagelijkse archieven en 2 wekelijkse)borg compact: comprimeer segmentbestanden in de repository
Borg repositories
boeken-borghandycam-borgimmich-borglouis-borgmusic-borgons-borg
Algemeen back-upscript
Dit script gebruik ik om back-ups te maken.
##!/bin/bash

## parameter one: upload path on local machine (ex. /data/other media/handycam)
## parameter two: remote host (ex. jp@192.168.1.155)
## parameter three: backup path on REMOTE machine (ex. /data/borg)
## parameter four: where to send email to. (ex. test.testing@gmail.com)

export BORG_UNKNOWN_UNENCRYPTED_REPO_ACCESS_IS_OK=yes

## Paths
## UPLOAD_LOCATION="$1" # Okay, I use # as delimiter to split multiple paths. this means that paths cant have a # in them... atleast the path that is passed as arugment
IFS='#' read -ra UPLOAD_LOCATION <<< "$1"
BACKUP_PATH="/backup/borg/handycam" # this DOESNT EXIST YET LOCAL
REMOTE_HOST="$2"
REMOTE_BACKUP_PATH="$3"
IFS=',' read -ra EMAIL <<< "$4"
REPO_NAME="$5"

if [[ "$1" == "" ||  "$2" == "" || "$3" == "" || "$4" == "" || "$5" == "" ]]; then
    printf "Need arguments..."
    exit 1
fi
printf "Backing up %s to %s in repo %s on host %s and reporting to %s" "$1" "$3" "$5" "$2" "$4"

## Initialize success flag
SUCCESS=true

## Temporary file to hold the output
OUTPUT_FILE=$(mktemp)

## Function to clean up the temporary file
cleanup() {
    rm -f "$OUTPUT_FILE"
}
trap cleanup EXIT # run cleanup on clean exit.


## Function to report the result
report_result() {
    if [ $1 -eq 0 ]; then
        echo "🟢 SUCCESS: $2" | tee -a "$OUTPUT_FILE"
    else
        echo "🔴 FAILURE: $2" | tee -a "$OUTPUT_FILE"
        SUCCESS=false
    fi
}

printf "\nborg create remote --  %s\n" "$(date)" | tee -a "$OUTPUT_FILE"
borg create --stats "$REMOTE_HOST:$REMOTE_BACKUP_PATH/$REPO_NAME::{now}" "${UPLOAD_LOCATION[@]}"  2>&1 | tee -a "$OUTPUT_FILE"
report_result $? "Backup creation"

printf "\nborg prune remote -- %s\n" "$(date)" | tee -a "$OUTPUT_FILE"
borg prune --stats --keep-daily=4 --keep-weekly=3 --keep-monthly=3 "$REMOTE_HOST:$REMOTE_BACKUP_PATH/$REPO_NAME" 2>&1 | tee -a "$OUTPUT_FILE"
report_result $? "Backup pruning"

printf "\nborg compact remote -- %s\n" "$(date)" | tee -a "$OUTPUT_FILE"
borg compact "$REMOTE_HOST:$REMOTE_BACKUP_PATH/$REPO_NAME" 2>&1 | tee -a "$OUTPUT_FILE"
report_result $? "Backup compacting"

printf "\n📚 Storage used:\n\n" | tee -a "$OUTPUT_FILE"
ssh "$REMOTE_HOST" df -h | tee -a "$OUTPUT_FILE"
printf "\n\n"
printf "\n📚 Archives:\n\n" | tee -a "$OUTPUT_FILE"
borg list "$REMOTE_HOST:$REMOTE_BACKUP_PATH/$REPO_NAME" 2>&1 | tee -a "$OUTPUT_FILE"


## Final summary report
if [ "$SUCCESS" = true ]; then
    printf "\n🟢 All backup operations completed successfully." | tee -a "$OUTPUT_FILE"
    # Send the output via email
    mail -s "🟢 BACKUP =$1= " "${EMAIL[@]}" < "$OUTPUT_FILE"
else
    printf "\n🔴 Attention required: One or more backup operations failed." | tee -a "$OUTPUT_FILE"
    mail -s "🔴 BACKUP =$1= (attention)" "${EMAIL[@]}" < "$OUTPUT_FILE"
fi
Je kunt het script als volgt gebruiken:
./borg-backup.sh '/data/other media/handycam' 'jp@192.168.1.155' '/data/borg' 'test.testing@gmail.com,another@outlook.com 'handycam-borg'Scripts
- Ik heb een paar handige scripts geschreven die ik op deze server draai.
- Ze bevinden zich op
/home/jp/Code/scripts